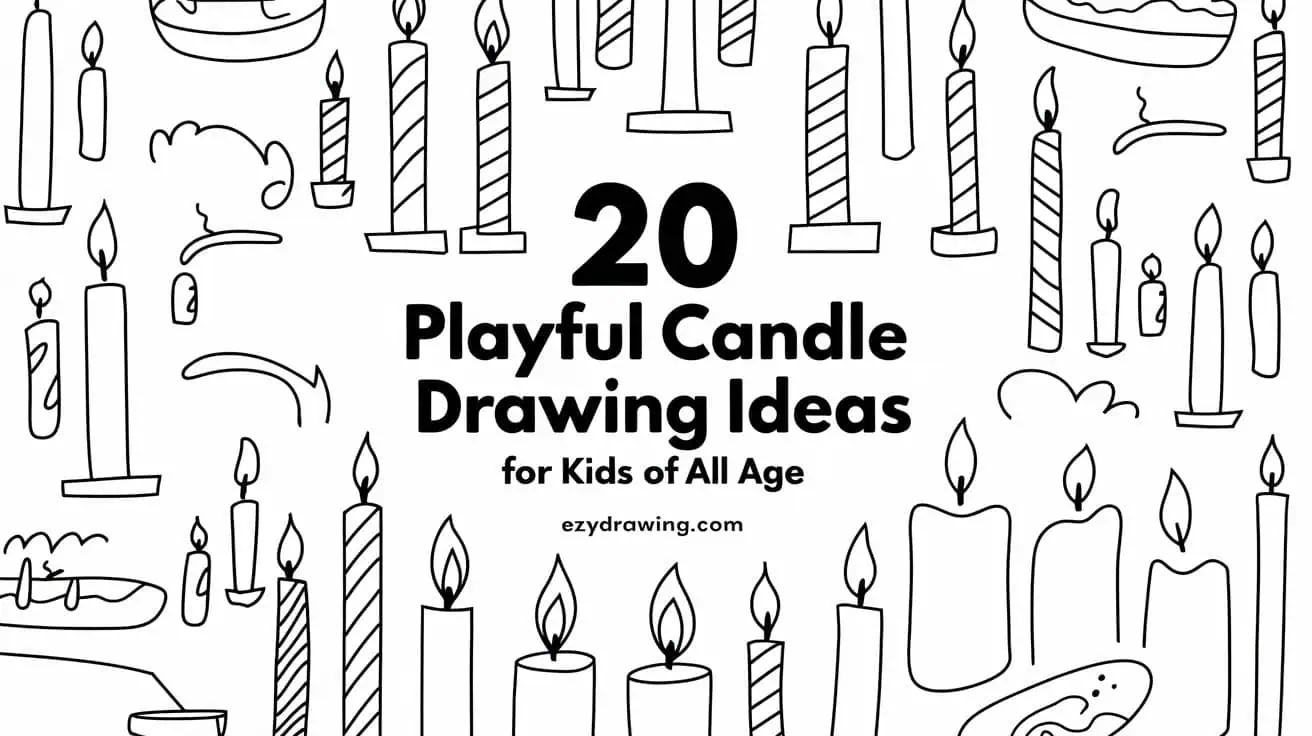
20 Playful Candle Drawing Ideas for Kids of All Age
Creative candle design ideas drawing provide a fun way for kids to express their imagination while building core sketching skills. Whether it’s a sleek style or a drippy idea, young artists can enjoy a variety of approaches that spark inspiration. From playful shapes to a realistic sketch drawing, this guide explores engaging visuals suitable for all skill levels.
We’ll also explore tips like how to draw to match your age or even how to draw a thinner candle for added detail. With options including long candle and realistic drawing, children can explore step-by-step visuals and learn how to draw confidently and creatively.
1. Straight Tall Candle Drawing

A simple illustration of a tall, slender candle with a small flame on top. The candle has a few wax drips down its side, adding to its charming, minimalist look.
Steps – Straight Tall Candle
- Draw the Base:
- Sketch a tall, narrow rectangle for the body.
- Keep the edges straight, and make the base slightly thicker than the top.
- Add Details and Flame:
- Draw a small teardrop shape the flame.
- Add a few short lines on the side to represent melting wax.
- Enhance the Wax Drips:
- Draw small curves on the candle body to show dripping wax.
- Add slight shading to give a three-dimensional effect.
- Finish with the Wick and Base Details:
- Add a tiny line in the middle of the flame to represent the wick.
- Outline the base with small, gentle lines to add texture. For additional ideas, explore simple drawing ideas.
Tips for Kids – Straight Tall Candle
- Start with a pencil so you can easily erase if you make a mistake.
- Draw the body straight and evenly for a neat look.
- Practice drawing small, controlled lines for the wax drips.
- Keep the flame small to match the candle’s simple style.
- Have fun decorating your different wax drip patterns!
2. Short, Stumpy Candle

A simple black-and-white illustration of a short, wide candle with a small, steady flame. This drawing showcases melted wax dripping down the side, giving it a classic look.
Steps – Short, Stumpy Candle
- Draw the Body:
- Sketch a rectangle shape for the body.
- Keep it short and slightly wider than a typical candle.
- Add Details and Flame:
- Draw a small flame at the top center of the candle.
- Add a melted wax drip coming down one side.
- Shape the Flame:
- Inside the flame, draw a smaller teardrop shape to give it depth.
- Make the flame pointy at the top and rounded at the bottom.
- Complete with Base Details:
- Add some small lines or shading at the bottom to represent the base.
- Optionally, add slight shading or lines on the texture.
Tips for Kids – Short, Stumpy Candle
- Use light pencil strokes first so you can erase easily if needed.
- Draw the body using a rectangle template or ruler for straight edges.
- Focus on keeping the flame small and simple.
- Don’t worry if the wax drips aren’t perfect; they can add to the natural look! For more creative inspiration, check out fun pencil drawing ideas.
- Have fun with the shading to make your candle look more realistic.
3. Candle with Melted Wax at the Top

This simple black-and-white drawing shows a tall with wax gently dripping down the sides, creating a sense of calm and warmth. This candle drawing captures the peaceful ambiance and beauty of a flickering flame, making it a perfect subject for anyone looking to practice their drawing skills.
Steps – Candle with Melted Wax
- Draw the Candle Base:
- Sketch a tall rectangle for the body.
- Make the edges slightly uneven to give a natural look.
- Add the Flame:
- Draw a teardrop shape on top of the for the flame.
- Add a smaller teardrop inside to indicate the inner glow.
- Create Wax Drips:
- Draw curving lines from the top to show melted wax.
- Extend a few drops down the sides for realism. For more inspiration, explore easy drawing ideas.
- Detail the Flame and Wax Pool:
- Add small wavy lines at the base for the wax pooling effect.
- Draw gentle curves around the flame for extra detail.
Tips for Kids – Melted Wax
- Use a pencil first, so you can erase any mistakes easily.
- Draw gently when adding the wax drips for a natural look.
- Keep the flame small to make it look realistic.
- Try adding shadows around the candle for more depth.
- Don’t worry about perfect lines—the drips can look uneven.
4. Thin Candle with Long Wick

A simple black-and-white drawing of a tall, thin with a long wick and a small flame on top. The candle has a smooth body with a bit of melted wax dripping down the side, capturing the serene and delicate appearance of a softly burning candle.
Steps – Thin Candle with Long Wick
- Draw the Candle Body:
- Sketch a tall, narrow rectangle for the candle’s body.
- Round off the top edge slightly to give the a natural look.
- Add the Flame and Wick:
- Draw a small line at the top for the wick.
- Create a teardrop shape around the wick for the flame.
- Add Wax Details:
- Sketch a small, curvy line down the side to show dripping wax.
- Make the wax look natural by curving the lines to follow the shape of the candle.
- Final Touches:
- Add texture to the flame by drawing a smaller teardrop shape inside.
- Darken the wick to make it stand out and check if the lines are neat.
Tips for Kids – Thin with Long Wick
- Use a ruler for straight candle edges if you want a clean look.
- Draw lightly with a pencil first, so you can easily make changes.
- Try shading the flame lightly for a glowing effect.
- Make the wax drips unique – they don’t have to be perfect!
- Have fun experimenting with different flame shapes to make it your own.
5. Wavy Candle Shape

A hand-drawn candle with a slightly melted top, giving it a natural and used look. The flame flickers gently above, and wax drips down the sides, creating a cozy and calming feel.
Steps – Wavy Shape
- Sketch the Candle Body:
- Draw a tall cylinder with slightly wavy sides for a more realistic look.
- Curve the top to form the edge where the wax has melted.
- Add the Flame and Wick:
- Draw a short line at the center top for the wick.
- Surround the wick with a teardrop shape for the flame, pointing upward.
- Draw Wax Drips:
- Add flowing lines from the top edge to represent melted wax.
- Make the drips uneven to give a realistic look.
- Enhance with Details:
- Add small teardrop shapes on the candle body for additional wax drops.
- Shade the base and edges lightly to add depth.
Tips for Kids – Wavy Shape
- Start with light pencil lines so you can erase and adjust as needed.
- Make the wax drips unique by adding wavy lines – they don’t have to be perfect.
- Use small, gentle strokes to create a natural-looking flame.
- Shade around the flame lightly for a glowing effect.
- Experiment with different candle shapes for fun, like taller or shorter designs.
6. Candle in a Small Holder

A simple drawing of a candle in a small, round holder. The candle stands upright with a gentle flame at the top, and the holder provides a stable base.
Steps – Small Holder
- Draw :
- Sketch a vertical rectangle for the body.
- Round the top slightly and add a small line for the wick.
- Add the Flame:
- Draw a teardrop shape above the wick to create the flame.
- Make the tip of the flame pointy for a realistic effect.
- Draw the Holder:
- Sketch a shallow oval under the form to top of the holder.
- Extend downward with curved lines to complete the base of the holder.
- Add Final Details:
- Draw a small wave on the candle’s top edge to show melted wax.
- Shade the holder slightly to give it a solid look.
Tips for Kids – Small Holder
- Use a coin to trace the round holder if you want a perfect circle.
- Draw lightly with a pencil first, so you can make changes easily.
- Make the flame glow by shading lightly around it.
- Add unique drips of wax on the candle if you like.
- Have fun with the holder shape! You can make it taller or wider for variety.
7. Candle Drawing with Twisted Design

A basic drawing of a candle with a slight twist in the flame shape, giving it a bit of character. This minimalist design captures the classic look of a burning candle, with a straight body and a single wick leading up to a pointed flame.
Steps – Twisted Design
- Draw the Body:
- Sketch a tall rectangle with rounded edges for the body.
- Curve the top edge slightly to give it a natural appearance.
- Add the Wick and Flame:
- Draw a small line at the center top for the wick.
- Outline a teardrop shape for the flame, tapering it at the top.
- Add Inner Flame Detail:
- Inside the flame, draw a smaller teardrop shape to represent the glowing center.
- Ensure the inner shape follows the contour of the outer flame.
- Refine the Shape:
- Darken the outline and check that the candle edges are smooth.
- Add any final details or corrections to the lines.
Tips for Kids – Twisted Design
- Use a pencil first for easier adjustments.
- Draw the flame quickly with one motion for a smooth look.
- Experiment with the flame shape – it doesn’t need to be perfect.
- Make the inner flame smaller for a glowing effect.
- Add a twist at the top of the flame for a unique touch.
8. Candle with a Drip Pattern

A cozy drawing of a candle with a small flame and wax dripping down the sides. The candle has a thick, sturdy body, and melted wax pools around its base, giving a realistic touch.
Steps – Candle with a Drip Pattern
- Draw the Base:
- Start with a tall cylinder shape with slightly rounded edges.
- Draw a curved top edge to represent the melted surface.
- Add the Flame and Wick:
- Draw a short line in the center for the wick.
- Add a teardrop shape above the wick for the flame, pointing upward.
- Create the Wax Drips:
- Draw wavy lines from the top edge down the sides for wax drips.
- Extend some wax drips to pool around the base.
- Enhance with Details:
- Shade lightly around the drips to add depth.
- Add a few light lines to show texture on the candle body.
Tips for Kids – Candle with a Drip Pattern
- Use wavy lines for the wax drips to make them look more realistic.
- Make the wax drips unique – they don’t have to match each other.
- Draw lightly with a pencil first, so you can adjust if needed.
- Experiment with the flame size – try making it bigger or smaller.
- Shade around the candle to give it a glowing effect if you like.
9. Candle with a Curved Top

A simple illustration of a candle with a curved, slightly uneven top, giving it a natural melted look. The has wax dripping down the sides, capturing the essence of a cozy, slowly burning candle.
Steps – Candle with a Curved Top
- Draw the Shape:
- Sketch a tall cylinder for the candle’s body.
- Add a curved, wavy line at the top to show melted wax.
- Add the Flame and Wick:
- Draw a short line in the middle at the top for the wick.
- Draw a teardrop shape above the wick for the flame, tapering it at the top.
- Create Wax Drips:
- Draw wavy lines starting from the top edge down the sides for wax drips.
- Make the drips different in length and shape to look more realistic. For creative ideas, check out balloon drawing ideas.
- Finalize with Details:
- Shade the top part of the candle lightly to show melted wax.
- Add slight lines around the base for a grounded look.
Tips for Kids – Candle with a Curved Top
- Draw the wax drips freely – they don’t need to be the same size.
- Use a pencil first so you can erase any extra lines.
- Experiment with the flame size to make it look more lively.
- Shade around the candle lightly to make it stand out.
- Have fun with different drip patterns to make each candle unique.
10. Thick Candle with Rounded Base

A basic black-and-white drawing of a thick candle with a single flame. The candle has a smooth, rounded body and a centered wick, giving it a classic look.
Steps – Thick with Rounded Base
- Draw the Candle Body:
- Sketch a wide, rounded rectangle to form the candle.
- Make the top edge slightly curved to give it a natural shape.
- Add the Wick and Flame:
- Draw a short line at the center of the top for the wick.
- Add a teardrop shape above the wick for the flame, tapering it at the top.
- Add Flame Detail:
- Draw a smaller teardrop shape inside the flame for a glowing effect.
- Darken the wick for contrast with the flame.
- Final Touches:
- Shade lightly around the candle to create a warm, glowing effect.
- Check the symmetry of the and adjust if needed.
Tips for Kids – Thick Candle with Rounded Base
- Use a ruler for straight candle edges if you want it to look clean.
- Draw the flame lightly first so you can adjust its shape.
- Make the inner flame smaller for a realistic glow.
- Experiment with candle height for variety.
- Have fun adding details like tiny wax lines for texture.
11. Candle with Bumpy Surface

A simple illustration of a candle with a textured, slightly bumpy surface, giving it a rustic look. The candle has small indentations and spots, with a centered wick and a gentle flame on top.
Steps – with Bumpy Surface
- Draw the Shape:
- Start by sketching a tall, rounded rectangle for the candle body.
- Curve the top edge slightly to show the melted surface.
- Add the Flame and Wick:
- Draw a small line at the center top for the wick.
- Sketch a teardrop shape above the wick for the flame, tapering it at the top.
- Create the Bumpy Texture:
- Add small circles and ovals randomly across the body for texture.
- Vary the sizes and spacing of the bumps for a natural effect.
- Final Touches:
- Shade lightly around the indents to add depth.
- Make sure the wick is dark and the flame is smooth.
Tips for Kids – Candle with Bumpy Surface
- Draw light circles first for the bumps, so you can adjust as needed.
- Add different-sized bumps to make the texture look realistic.
- Experiment with shading around the bumps for a 3D effect.
- Use a pencil lightly at first to adjust the texture easily.
- Add small wax drips if you want to make the candle more unique.
12. Small Candle with a Wide Flame

A small, stubby candle with a broad flame that stands out. The thick and short body gives it a cute, compact appearance. The wide flame adds a lively touch to this simple design.
Steps- with a Wide Flame
- Draw the Candle Body:
- Start with a short, wide rectangle shape for the candle.
- Round the top slightly to make it look melted.
- Add the Wick and Flame:
- Draw a short line in the center top for the wick.
- Sketch a large, broad flame above the wick, slightly wider than usual.
- Add Flame Details:
- Inside the main flame, draw a smaller flame shape for detail.
- Make the inner flame follow the same broad shape as the outer flame.
- Final Touches:
- Add a few vertical lines on the candle body to show texture.
- Make the wick darker to stand out against the flame.
Tips for Kids – Small Candle with a Wide Flame
- Draw the flame wide to give it a unique look – it’s okay if it’s bigger than usual.
Use gentle curves for the flame to make it look soft and warm.
Experiment with shading around the candle for a glowing effect.
Keep the short and thick for a stubby appearance.
For more inspiration, explore ice cream cone drawings.
Add a small inner flame to make the drawing look more realistic.
13. Candle with Spiral Groove

A tall, simple candle with a spiral groove design wrapping around it. The candle has a small flame at the top, creating a clean, elegant look.
Steps – with Spiral Groove
- Draw the Body:
- Start with a tall, narrow rectangle for the body of the candle.
- Make sure the top edge is rounded to look natural.
- Add the Wick and Flame:
- Draw a small line in the center top for the wick.
- Add a teardrop shape above the wick for the flame.
- Draw the Spiral Groove:
- Starting from the bottom, draw a diagonal line wrapping around the candle in a spiral.
- Keep the spacing even as the line moves up to the top.
- Finalize with Details:
- Darken the wick and add a smaller teardrop shape inside the flame for detail.
- Check the spiral lines to make sure they’re smooth and even.
Tips for Kids – Spiral Groove
- Use a pencil for the spiral so you can adjust it easily.
- Draw the spiral lightly first, then darken it.
- Keep the spacing even to make the spiral look smooth.
- Experiment with different flame shapes for variety.
- Try making the spiral thicker or thinner for a different effect.
14. Thin Candle with Small Holder

A thin, tall candle placed in a small, round holder. The simple and elegant design in this candle drawing gives it a classic look. The small flame at the top and the sturdy holder at the bottom create a peaceful, stable vibe.
Steps – Thin with Small Holder
- Draw the Body:
- Start by sketching a long, narrow rectangle for the candle body.
- Make the top edge slightly rounded for a natural look.
- Add the Wick and Flame:
- Draw a short line in the center top for the wick.
- Sketch a small teardrop shape above the wick for the flame, with a narrower shape inside for detail.
- Draw the Holder:
- Draw an oval shape under the candle for the top of the holder.
- Extend the sides downward in a rounded shape to complete the holder.
- Add Final Details:
- Shade the inside of the holder lightly to give it depth.
- Make sure the flame is well-defined and the candle is centered.
Tips for Kids – Small Holder
- Use a pencil first so you can adjust the holder shape easily.
- Draw the flame small to match the thin candle.
- Shade lightly inside the holder for a 3D effect.
- Try using a coin to help draw the round holder.
- Keep the lines clean to maintain the simple look.
15. Stacked Candle Drips

A tall candle with thick, flowing wax drips that reach down the sides, creating a rustic, well-used appearance. The melted wax even pools at the base, adding to the cozy and warm feel of the design.
Steps – Stacked Candle Drips
- Draw the Body:
- Begin by sketching a tall, rounded rectangle for the candle body.
- Curve the top edge slightly, giving it a natural melted look.
- Add the Wick and Flame:
- Draw a small line at the center top for the wick.
- Add a teardrop shape above the wick to create the flame, with a smaller teardrop inside for detail.
- Draw the Wax Drips:
- Draw thick, wavy lines from the top edge to represent wax drips down the sides.
- Extend some wax drips to pool around the base.
- Enhance with Details:
- Shade lightly around the drips to add depth.
- Add a few light lines to show texture on the body.
Tips for Kids – Stacked Candle Drips
- Make the wax drips thick – they don’t need to be uniform.
- Draw the wax pools freely at the base for a realistic effect.
- Experiment with flame size to make it more lively.
- Use light shading around the wax for a 3D effect.
- Add more or fewer drips to make each candle unique.
16. Small Rounded Candle

A small, rounded candle with a short, simple flame on top. This minimalist candle drawing features a smooth body with a subtle wax drip on the side, giving it a gentle and cozy appearance.
Steps – Small Rounded
- Draw the Body:
- Start by drawing a short, rounded rectangle for the candle.
- Curve the top edge slightly for a smooth, melted look.
- Add the Wick and Flame:
- Draw a short line in the center top for the wick.
- Sketch a small teardrop shape above the wick for the flame.
- Draw a Wax Drip (Optional):
- Add a small, wavy line starting from the top edge for a wax drip.
- Extend the drip slightly down the side of the candle.
- Add Shadow Under the Candle:
- Draw a soft, oval shape at the base of the candle to represent a shadow.
- Shade the shadow lightly for a subtle effect.
Tips for Kids – Small Rounded Candle
- Draw the candle short and round for a cute, cozy look.
- Keep the flame simple – just a small teardrop shape.
- Use a pencil first so you can adjust the drip easily.
- Shade the shadow lightly for a grounded look.
- Experiment with the flame height to see what looks best.
17. Double-Layered Candle Base

A sturdy candle with a slightly wider base and a slanted, melted top. The wax drips down from the top, adding to its rustic, well-used look.
Steps – Double-Layered Candle Base
- Draw the Body:
- Begin by sketching a tall rectangle with a slightly wider base for stability.
- Draw a slanted line at the top edge to give the a melted look.
- Add the Wick and Flame:
- Draw a short line in the center top for the wick.
- Sketch a teardrop shape above the wick to form the flame.
- Draw the Wax Drips:
- Starting from the top edge, draw wavy lines down the sides to show melted wax.
- Add some wax lines flowing naturally along the slant of the top.
- Enhance with Shadow:
- Add a light shadow at the base of the candle to give it a grounded feel.
- Shade lightly around the drips for depth.
Tips for Kids – Double-Layered Candle Base
- Draw the base slightly wider for a sturdy look.
- Use gentle curves for the wax drips to make them appear natural.
- Make the flame small and simple for a cozy look.
- Shade the shadow softly to make the candle look grounded.
- For creative inspiration, check out fun drawing ideas.
- Try different drip lengths to make each candle unique.
18. Simple Tall Candle Drawing with Leaning Flame

A tall, slender candle with a slightly leaning flame, giving it a gentle, dynamic feel. This candle drawing adds movement and warmth to the image, creating a calming and inviting atmosphere.
Steps – Simple Tall with Leaning Flame
- Draw the Body:
- Start with a tall, narrow rectangle shape for the body.
- Curve the top edge slightly to give it a natural look.
- Add the Wick and Flame:
- Draw a short line in the center top for the wick.
- Sketch a teardrop shape for the flame, leaning slightly to one side for a natural effect.
- Add Light Texture:
- Draw gentle, diagonal lines across the candle body for subtle texture.
- Make sure the lines are light and even to keep the design simple.
- Shade Lightly:
- Add shading along one side of the for a 3D effect.
- Shade the wick and inside the flame to make them stand out.
Tips for Kids – Simple Tall Candle with Leaning Flame
- Draw the flame at a slight angle to give it a natural look.
- Keep the texture light with gentle, short strokes.
- Shade one side of the candle to make it look round.
- Experiment with different flame sizes to see what looks best.
- Use a pencil first so you can adjust the shading easily.
19. Candle with Uneven Base

A charming candle with an uneven, slightly wobbly base, giving it a unique, handmade feel.
Steps – with Uneven Base
- Draw the Body:
- Start by sketching a tall, slightly uneven rectangle for the body.
- Make the base wobbly by adding slight curves to give it a handmade look.
- Add the Wick and Flame:
- Draw a short line in the center top for the wick.
- Sketch a teardrop shape above the wick for the flame.
- Add Wax Drip and Texture:
- Draw a small, wavy line near the top edge to show a wax drip.
- Add a few small lines or dots on the body for subtle texture.
- Enhance with Shadow and Details:
- Shade the base lightly to give it a grounded feel.
- Add slight shading on the candle body to make it appear more 3D.
Tips for Kids – Uneven Base
- Draw the base uneven – it doesn’t need to be perfect.
- Add a small wax drip for a realistic touch.
- Use gentle shading around the base to make it look grounded.
- Experiment with the flame shape – it doesn’t need to be straight.
- Draw light texture lines to give the candle a handmade look.
20. Candle with Tiny Stars Around

A tall, simple candle with a small, steady flame, surrounded by tiny starry accents, creating a magical and peaceful ambiance.
Steps – Candle with Tiny Stars Around
- Draw the Body:
- Begin with a tall, rounded rectangle shape for the candle body.
- Keep the top edge smooth and slightly curved. For more creative inspiration, visit simple drawing ideas.
- Add the Wick and Flame:
- Draw a short line in the center top for the wick.
- Sketch a small, delicate teardrop shape above the wick for the flame.
- Draw Starry Accents:
- Around the candle, draw small star shapes with simple, cross-like lines.
- Add tiny circles and dots between the stars for extra sparkle.
- Add Shading:
- Lightly shade one side of the candle to give it depth.
- Shade to create a soft shadow for grounding.
Tips for Kids – Candle with Tiny Stars Around
- Draw tiny stars around the candle for a magical look.
- Keep the flame small and centered for a peaceful feel.
- Use gentle shading to make the look round.
- Try different star shapes to see what looks best.
- Draw light dots for an extra sparkle effect.
Conclusion:
Exploring candle drawing ideas is a delightful and engaging activity that nurtures creativity, encourages imagination, and improves hand-eye coordination. Whether you’re interested in a dripping candle drawing, a realistic pencil candle drawing, or playful drippy drawing ideas, there’s something inspiring for every young artist. Kids can sketch a long candle drawing, draw a thinner candle, or even draw candles to match your age for a birthday-themed challenge.
They can also explore candle design ideas drawing, adding decorative holders, melting wax effects, or creative backgrounds. By incorporating drawing ideas drippy with fun textures and flame patterns, children learn how to draw a candle in unique and expressive ways. With each attempt, they’ll grow more confident in their artistic abilities and develop a collection of charming candle sketches they’ll be proud of!


2 Comments